Archive for April, 2012

My First Pins!!

I’ve talked for months about different projects on Pinterest, and then it dawned on me. Why haven’t I been pinning some of my own projects?! I still don’t have the answer to that question.

So three days ago, I pinned my first project. Actually, that’s a lie. I pinned my first two projects. Okay, okay – so it’s a bit addicting, and I lied again. For real, though, I pinned my first three projects. It literally took me four minutes to complete it. That’s another really good thing about Pinterest – it’s so easy to upload pins.

Here’s how to upload your own pin for you newbies out there (don’t worry, I still consider myself a newbie):

  1. Sign into your Pinterest account.
  2. At the top right, click on Add +.
  3. Click on “add a pin” on the left of the screen that pops up.
  4. Type in the website that hosts the photo you want to pin. In my case, it was URLs to three specific blog posts on www.soverrystansberry.com.
  5. If there is more than one photo from the URL that you type in, you will need to scroll through the photos on that site to choose the exact one you want to feature.
  6. You will then choose which of your boards you would like to pin it to, and in my case, all of mine were on my DIY board.
  7. Next, add a description, and then pin it!
  8. Pat yourself on the back for pinning your first pin.

I will have to say that it feels pretty good, especially since I had five repins in the first 10 minutes of posting my necklace storage project pin.

This opens up a whole new aspect of Pinterest for me, and I’m going to predict that it’ll get pretty addicting (as if it wasn’t already!).

Happy pinning!

My first pin!

This is the "add a pin" screen that will pop up during the process.

Favorite of the Week: Wine Cork Letter

Retrieved from adventuresindiy1759. blogspot.com/

Pinterest has been doing a good job of reminding me of things lately. Yesterday, as I was browsing the site, I ran across this DIY wine cork letter project. That’s when I remembered that my friend, Tina, sent me a picture message the other day of one she had done. Since her last name is Cole, she obviously did the letter ‘C.’

Chrissy, the blogger over at Adventures in DIY, lists step-by-step instructions on how to create this really neat cork monogram for your home. The corks are actually glued together with no backing in place, which means no extra supplies!

My friend, Tina, did hers a little differently. Instead of gluing the corks to each other, she bought a wooden letter ‘C’ at Hobby Lobby, painted it red and then hot glued the corks to the letter. Look how awesome hers turned out in the following before and after photos:

Before

After

I’m thinking an ‘S’ might happen in my near future (after these next 10 days of school are over). Does anyone have any extra wine corks?

*Note: I absolutely do NOT recommend massive amounts of wine drinking in order to complete this craft. Just save them until you get the amount you need! Or better yet, get some from a friend who’s not using them.

God’s Beautiful Creations

It’s a beautiful Sunday in East Tennessee, and I’m stuck inside working on homework all day. Something about that sentence doesn’t really go together, now does it? But I will say, the one thing that’s keeping me going is knowing that in eleven days, I will have finished my fourth semester of grad school. So close, right?

So to cheer myself up, I stepped outside for a few minutes to get some fresh air and clear my head from all this homework craziness. I’m glad I did because one walk up and down my sidewalk was enough for me to become entranced by God’s beautiful creations. So I took my phone out of my pocket, opened up the Instagram app, and decided to document them for you.

This is also the point where I admit that I know nothing about flowers and/or what they’re called. So please excuse my references to “that pretty flower” and whatever else I come up with.

I just love these flowers. Todd and I went to Lowe’s the other day to buy something completely unrelated to flowers, but we came out with these. We have two beautiful urns on each side of our front porch, so we thought these would be great to fill them with. Except, they didn’t actually fill the urns. So we’ll be taking a trip back to Lowe’s to get some more. 🙂 Either way, though, aren’t they purty??

Whatever this thing is, I love it. My neighbor dug this out of her flower garden two summers ago and said that if we don’t like it, not to plant it. Because once you do, they keep growing and growing and growing! Boy, she was right. We started out with a tiny, tiny patch of it, and it’s grown quite a bit. But it looks so tropical and adds a nice touch to our flower bed. No complaints here!

I’m proud to say that I do know what this one is – an azalea bush! This is Todd’s favorite each year when it blooms. It definitely adds a lot of character to the front of our house.

I’m definitely on a roll because I know what this one is, too. It’s a Japanese emperor tree, and my in-laws got this for us the first summer after we got married. It’s such a beautiful addition, and I adore the colors.

What a nice break that was from my homework. Too bad it didn’t last that long!

Until next time…

Favorite of the Week: Paint Chip Art

This week’s favorite of the week is this DIY paint chip art I ran across on Pinterest. The pin linked back to Our Little Casita, and Emily (the blogger) actually mentioned she saw the project first at Tatertots & Jello and fell in love with it.

What got me thinking is that I’m always so interested in filling my picture frames with actual pictures that I forget to step outside of the box sometimes. The best part about this project is you can tweak it to be any color you want!

All you have to do is punch out paint chip circles with a scrapbook puncher and glue them to a piece of cardstock that you’ve cut out to fit the size of your frame. And then obviously – glue them on. I mean, can it get any easier than that?

Emily chose a gradual color change, and I have to say, it’s stunning. My wheels are already churning, and I’m thinking I might go from a deep teal to a lighter teal to match some of the different accents in my new living room.

What do y’all think?

Yes, That’s Me on The Martha Stewart Show Wearing a Mustache

As I was browsing Pinterest today, I came across this mustache on a stick pin, and I’ll have to say, it made me laugh. But the reason it made me laugh is one that you’d probably never think of. And I mean never!

What would you say if I told you I was in the front row on set at The Martha Stewart Show wearing a mustache?

I’ll go ahead and give you the answer: You’d think I was crazy.

But I promise, I’m not! And I have proof for you.

In October 2008, I was a senior in the journalism and electronic media program at the University of Tennessee. An opportunity came up for journalism juniors and seniors to go on a school trip to New York City to speak with our own alumni now working in the industry. In addition to some pretty cool meetings with some really wonderful companies, we were able to attend some live tapings of shows in the city. I was able to attend Conan, Good Morning America and The Martha Stewart Show. Our faculty chaperone was able to get her hands on these free tickets in advance of the trip, which was great.

There were probably 20 students on the trip, and since our chaperone wasn’t able to get 20 tickets for every show, she drew names from a hat to determine who would go to what show.

About six of us were able to attend The Martha Stewart Show, so we all stood in line together. It was kind of a long process because you have to go through security and then wait to be seated by sections. Once we were finally in and seated, we were all pretty far in the back, which was totally fine with me. I was just excited to see the show! My friends and I noticed there were a few open seats on the actual floor, right in front of Martha’s kitchen island where she does a lot of stuff during the show. Unlike where we were sitting, they were just individual chairs set side by side.

It was probably about 10 minutes before the show started that an employee from the show came up to my friend Rob and me and asked us to follow her. We didn’t know what the heck was going on! And neither did our friends we were sitting with! But we got out of our seats and followed her. She walked us to the very front row and said that those were our new seats for the show. She asked if we would be willing to be on camera and help Martha out with one of her projects she would be working on during the show. Our reply: heck yessssss!

So to make a long story short, we helped Martha out with a “mustache on a stick” craft she was doing for Halloween. Our job for much of the show was to sit there holding up our mustaches. If you want to check it out with your own eyes, click here and then click on the video to the left under “watch the video.” I promise I’m not trying to be vain, but I did jot down the exact times within the video that my friend Rob and I are featured: 0.19, 2:07 and 7:43. I’m in the solid yellow shirt!

What can I say – I was able to get my 15 minutes of fame. Well, once you add these couple minutes to the few minutes on Good Morning America and the quick few seconds on Conan. Really, though, what a wonderful trip!

Now, back to what made me think of this story in the first place – the Pinterest pin. Just so I don’t completely leave you guys hanging, check out the original blog post of the mustache on a stick from Easy Makes Me Happy! in case you want to try it out on your own.

I’ll let you know when I’ll be signing autographs.

My Sister’s So Chic Bedroom

My little sister takes pride in her bedroom. That’s just the way it is. But there are two different kinds of pride. One, in the way her room is decorated. Chic… sophisticated… it’s however you want to put it. Two, in the way she keeps it immaculate. Like, all the time. I’m talking, if I have an unfinished snack in her room and happen to step out for two point five seconds, she has already taken it to the kitchen, assuming I’m just finished with it and too lazy to clean up after myself. But that’s besides the point. 🙂

Back to her room.

What I love most about it is that it’s so her. She’s put her own touches on it and made it chic, which totally describes her personality. The best part is that she did everything on an extreme budget! She looks at it as a game – finding the cutest stuff possible for the cheapest price possible. That’s the best of both worlds!

I took some photos using Instagram, so we’ll just go right down the list:

We like to call these her star candles. They add such a nice touch to her wall! Laura bought them at Kirkland’s a while back for $10 for the set!

My mom actually bought this rug for Laura, and it had a ridiculously low clearance price of $15 on the tag! Laura loves NYC, so this was perfect. A great Target find!

Now, this is just too cute for words. Laura was tired of her plain, white lamp, so she found some old ribbon laying around the house and did her thing. Adorable!

Laura’s Empire State Building was about $4 on clearance at Target, and the sparkly candles were only $0.50 each at JCPenney. Again, a great deal! It’s simple, yet very chic.

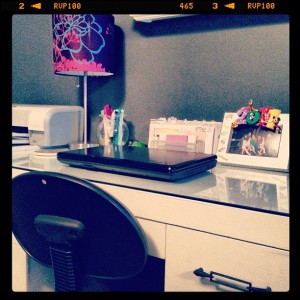
This desk is awesome. It actually used to be brown, but Laura painted it white and added a glass top. A $15 find at a garage sale.

And of course, the famous shoe wall. Go check out the original post here.

As you can see, my sister has style. There’s no question about it. She’s also proof that you don’t have to spend lots of money to decorate a room. My challenge to you as you’re shopping this week is to walk straight to the back of the store. Go find the clearance rack first. If you don’t find anything (and trust me, there are a lot of times that you won’t), don’t give up. There are always bargains to be had. 🙂

My Outdoor Furniture Dilemma

I like to browse the HGTV Design Happens blog every now and again for home improvement ideas, and this time around, I ran across a post titled, “Daily Delight: Lightweight Concrete Furniture.” I am completely in love.

As it turns out, this gorgeous outdoor furniture design by Zachary A. Design only looks heavy. But as pointed out in the post, it’s “light enough to be moved by a toddler.” It is made from a combination of fiberglass and coarse sand, so it’s light enough to move yourself, but heavy enough to withstand the East Tennessee breezes we get to experience oh so frequently.

I’m not going to buy the furniture (at least right now), so you’re probably wondering why I’m even writing about it. Well, besides the fact that I would absolutely love to put this furniture set on my deck if I had a few extra dollars in my pocket (the price points, according to The New York Times, are $800 for the chair to the right in the photo and $900 for the chair to the left in the photo), just even looking at this furniture reminds me of a recent dilemma Todd and I have experienced with respect to our deck furniture.

After we tore down our old deck and built a new one, Todd’s grandparents decided they wanted to give us their old patio furniture. It’s the wrought iron kind that just needed a few cushions to be complete. Well, that and a couple coats of black spraypaint to cover up some rust. It had just been sitting in an outside storage building and wasn’t being used by them, so we graciously accepted the gift and got to purchasing cushions for it. Todd’s mom and I actually went around looking for cushions to put on the furniture. I never, ever realized how expensive cushions are! It wouldn’t be that bad if you only had to buy one of the full-size cushions, but we needed six! Ouch!

We got everything set up outside, and it looked great. Our sweet doggies were in Heaven with the cushions. Here’s a picture of Bella laying on the cushions one day when we had to bring them in before the rain:
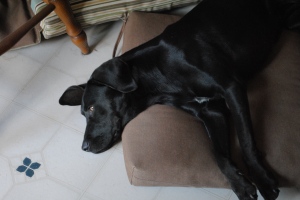
Notice the old kitchen flooring!

About a year went by before the dogs realized the cushions were more fun to destroy than to lay on. Todd and I were both working full time, so during the day, the dogs stay outside. However, in case there’s inclement weather or they just want to be cooled off, we have a doggy door where they can come into a portion of the garage. Todd built a 6×8 area for them to lay in, and we filled it with cedar chips. They absolutely love it.

Back on topic, now. So yes, they realized how fun it would be to tear a piece of the cushion, and spread all the stuffing all over the deck and the backyard. They started with two cushions. We couldn’t figure out why they would start doing this now, after an entire year of having the cushions out there. Evidently they were bored while we were gone. So a couple weeks later, Todd went to Lowe’s to buy two more cushions. We thought, hey, this has got to be a fluke. They won’t do it again!

Wrong.

One by one, the dogs destroyed all the cushions. We didn’t want to take them off to punish them because, heck, then it would be punishing us, too! Todd and I love to go outside and just sit by the fireplace.

To make a long story even longer, we simply gave up on the old set and bought a couple chairs that didn’t require cushions this time around! The best part is that they were less than $30 a piece at Ross. Todd’s mom had some extra lounge chairs she had bought for her pool, so she gave us two of her extras, too. As you can tell, Bella is already loving them. Either that, or she’s being extra mischievous in planning out her next attack on the chairs.

Now we can enjoy our fireplace on cool nights without worrying about destroyed cushions. If these new chairs somehow become destroyed, does anyone want two dogs?? Kidding, just kidding! 🙂

Favorite of the Week: Stone Tile Placemats

Who says you have to use tile as tile?

I was looking on Pinterest a few months ago (who me?! I know, I know) and ran across this out of the ordinary placemat for the kitchen table. I’m always intrigued when I see objects not being used the way they were intended to be used. But in my opinion, this is way cooler than using it as plain ol’ tile. Way cooler.

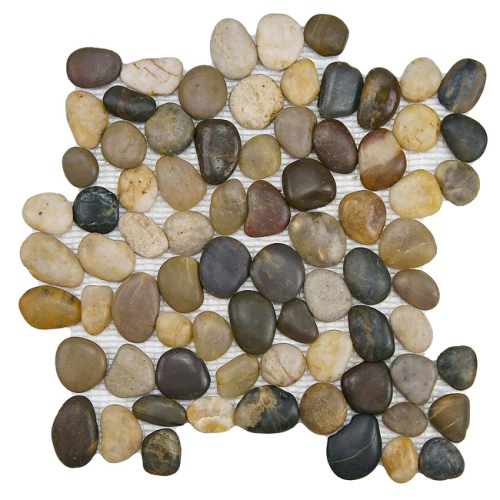
There are really no directions that accompany this project. Just buy the tile, and use it as a placemat! But where you can make alterations is in color/design choices. For that reason, I looked up some stone tile “placemats” on both the Lowe’s website and the Sears website. Here’s what I found:

Image retrieved from Lowes.com

Image retrieved from Sears.com

The Lowe’s tile can be found here, but be warned – it’s going to cost you over $100 because it comes in a package of 10. The same goes for the Sears tile. Maybe you and your best friend can go in half and half to decorate your dining room tables the same way! I’m sure they can be used in other ways, too, though. Does anyone else have any other ideas for these tiles? Do share!

Meeting Fellow Bloggers

This blogging experience, although I’m maintaining it for class, has opened up my eyes to quite a bit of stuff – one thing being the people you “meet” through blog posts. Let me clarify…

I didn’t really think anyone would be commenting on my posts. I figured if anyone would, it would be my family or close friends. But the opposite has actually been true. Now, granted, I don’t get comments on all my posts, and when I click “submit” on a post, I’m not impatiently awaiting to get a notification to approve someone’s comment. But c’mon, it does make a girl feel good when she gets to interact with people about a subject she loves.

And I’m learning people are very polite, too! Most of the Pinterest projects I’ve featured on my blog have generated comments from the original creator of the project, simply thanking me for writing a post on his or her project. I also noticed that Hollie from I’m Busy Procrastinating, who I found from the wall baskets for bathroom storage project I featured, thanked all the “fine bloggers” who featured her projects. She listed my blog banner with a link to my blog (along with others). Totally neat!

So because I appreciate interaction with my fellow DIY bloggers, I’m going to tell you about a neat blogger I follow. After I wrote a post about turning my Pinterest pins into projects, I received the following comment from a fellow DIYer:

“Great post! I was asking that question my self a while back which is why I started my blog, ipinterest, to challenge myself with 365 days of pinterest creations. Some days it is really hard to do, but so far, 84 days into it, I am throughly enjoying it, learning a few new things, and very glad I am doing it! Good luck to you as you venture into your other boards, you’ll be glad you did!”

Wow, and let me tell you. This blogger is dedicated. If you get a chance, go check out ipinterest. The blogger, Karie, as you can see above, has challenged herself to turn her pins into projects. Every day for a YEAR! How awesome is that? My favorite part about her posts is that she always includes a difficulty level between 1 and 5.

Anyway, all that to say that I’m thankful for the interaction I’ve gotten out of this blog. No, it’s not a lot. But it’s way more than I expected! I look forward to making more “friends” throughout my blogging experience.

And no, this is not April Fool’s. I promise, I really am thankful. It’s not a joke. 🙂


Posts, Old and New